
View the GitHub repo for more information.
What is Aeroframe Homebase?
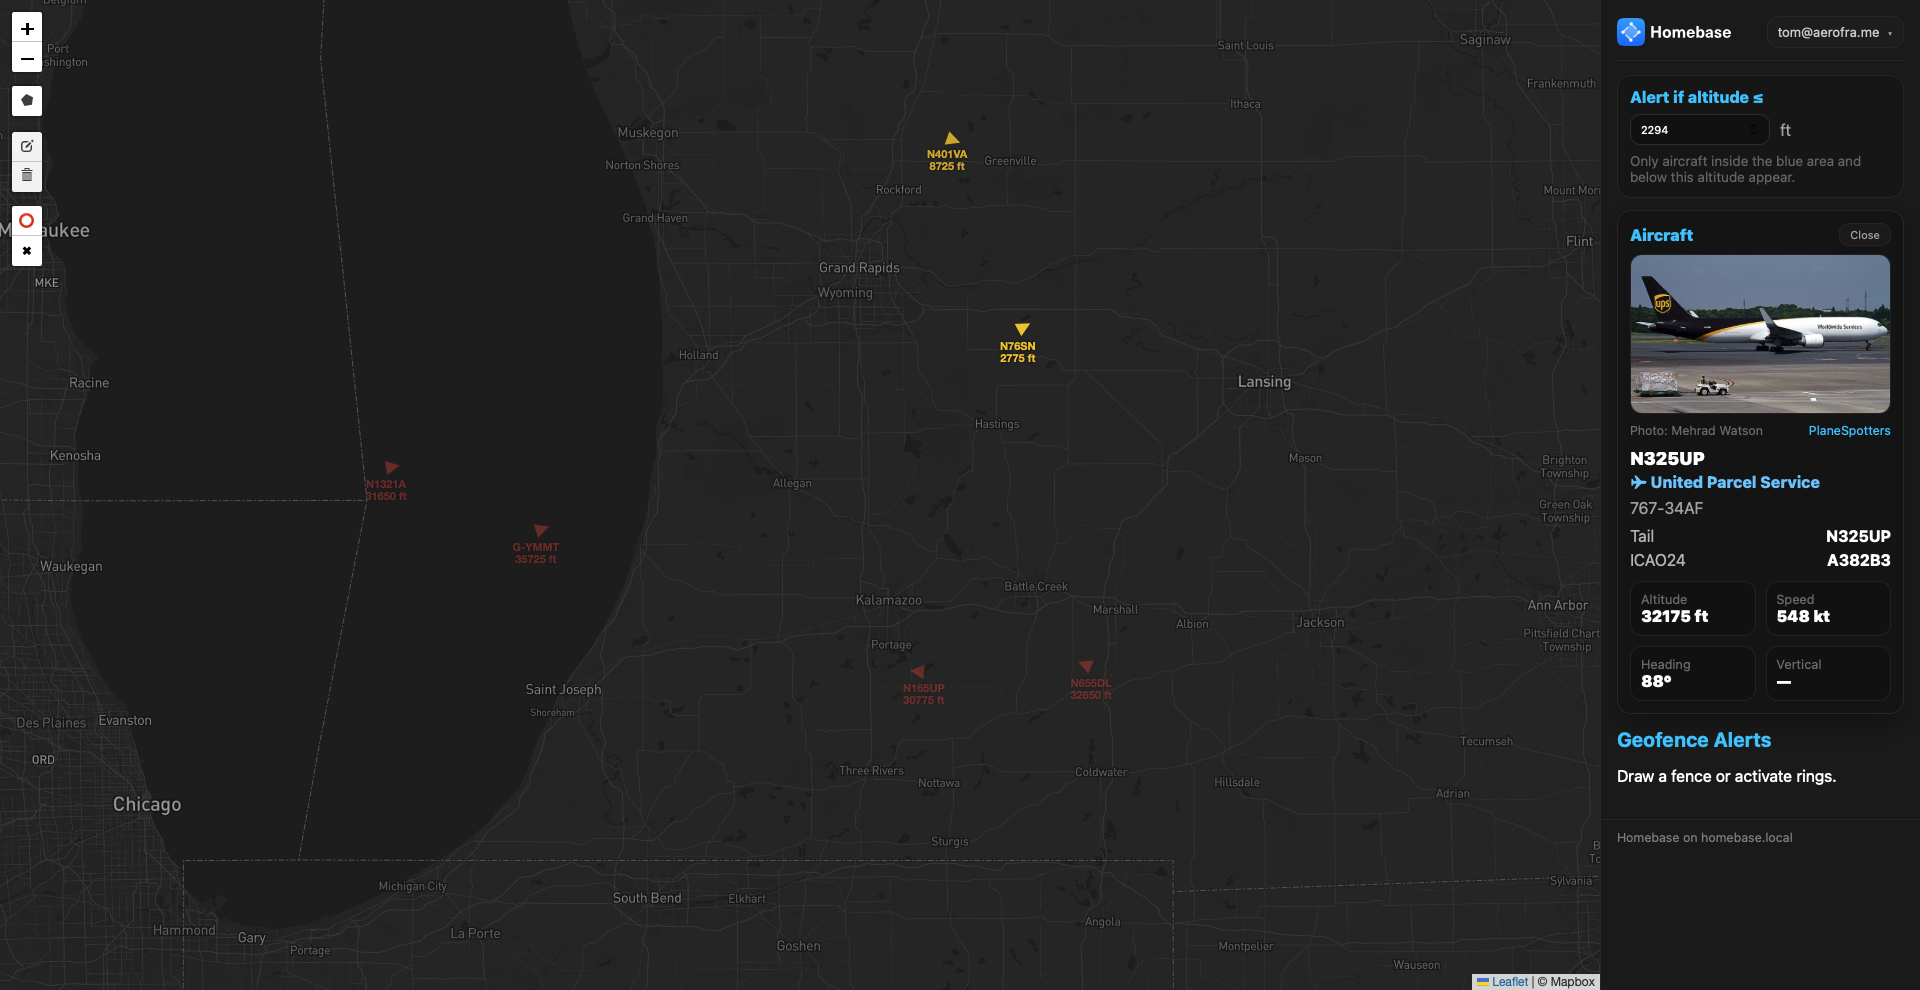
Aeroframe Homebase is a Linux-based ADS-B monitoring platform designed for aviation operations. It uses RTL-SDR receivers and Raspberry Pi hardware to track aircraft movements both in the air and on the ground — in real time.
Think of it as your private operational aircraft tracker, built specifically for you and your business.
Homebase provides local aircraft awareness, approach visibility, and ground movement insight — giving FBOs, airports, flight departments, and operators a clearer picture of inbound traffic before it reaches the ramp.
It integrates seamlessly with the Aeroframe ecosystem, supporting operational decision-making across fueling, deicing, movements, and dispatch workflows.
Aeroframe Homebase — Setup guide for Raspberry Pi ADS-B RTL-SDR
Official Setup & Operations Guide (Raspberry Pi 3B+/4/5 / Raspberry Pi OS)
Overview
Homebase is Aeroframe’s Raspberry Pi–based ADS-B receiver and local operations server.
It supports:
- 1090 MHz (Mode S / commercial traffic — global)
- 978 MHz (UAT) (US-only GA traffic)
- Local web dashboard via nginx
- mDNS access via homebase.local
- One-command updates
- adbsb.lol API (May require credentials in the future — https://api.adsb.lol/docs)
⚠️ A single RTL-SDR dongle can only run one band at a time.
Requirements
- Raspberry Pi (3B+/4/5)
- Raspberry Pi OS (64-bit recommended or 32-bit depending on Raspberry Pi)
- 32 GB micro-SD card with standard SD card adapter
- RTL-SDR (FlightAware Pro Stick recommended)
- Network connection (WiFi or wired ethernet)
- Peripherals such as HDMI cord, wired keyboard, and wired mouse
- Locality is US-based only
- Subscription to Aeroframe LineOps
Initial Setup (Raspberry Pi 3B+/4/5)
1️⃣ Flash Raspberry Pi OS
Use Raspberry Pi Imager (https://www.raspberrypi.com/software/) to install Raspberry Pi OS to your SD card. Balena Etcher is also useful for flashing Raspberry Pi OS toan SD card but not required — https://etcher.balena.io. However, for this guide, we will focus on using Raspberry Pi’s official tools.
[GRAPHIC DEPICTING INSERTING SD CARD INTO RASPBERRY PI]
Insert SD card into Raspberry Pi after formatting and flashing the card with Raspberry Pi imager
[GRAPHIC DEPICTING PLUGGING IN POWER FOR RASPBERRY PI]
Attach your power cable to start the Pi
Your computer may ask for permissions to erase and write to the disk. You may enter your password to start or click the prompt to continue the process.
- Enable:
- SSH
- Set hostname to: homebase-setup
- Set username: homebase-setup
- Set password: password1!
2️⃣ SSH Into Pi
Once you have completed the above steps to flash the SD card and provided power to the Raspberry Pi you will now want to SSH into the Pi using a Wifi or ethernet connection. We will assume that you have connected to the Pi using an ethernet cable that is established on your local network. This allows us to SSH via a terminal to install the core Homebase packages and requited utilities.
[GRAPHIC DEPICTING PLUGGING IN ETHERNET CABLE FOR RASPBERRY PI ZERO]
Attach your ethernet cable to the Raspberry Pi.
⚠️ You can disregard plugging in an ethernet cable if you setup your wireless internet connection during the initial flashing of the SD card.
ssh aeroframe-setup@homebase-setup
# or fallback:
ssh aeroframe-setup@<raspberry-pi-ip>
⚠️ You might have to clear out known_hosts if you have previously acquired aeroframe-testbed with SSH.
3️⃣ Optional: Enable SSH / VNC
sudo raspi-config- Interface Options → Enable SSH
- Interface Options → Enable VNC (if desired)
4️⃣ Create Installation Directory (One Time)
sudo mkdir -p /opt/homebase
sudo chown homebase-setup:homebase-setup /opt/homebase
5️⃣ Clone Repository
cd /opt
git clone https://github.com/aeroframe/homebase.git homebase
6️⃣ Fix “Dubious Ownership” (Git Safety)
git config --global --add safe.directory /opt/homebase
7️⃣ Make Scripts Executable (One Time)
cd /opt/homebase

sudo chmod +x scripts/install.sh
sudo chmod +x scripts/update.sh
sudo chmod +x scripts/healthcheck.sh
sudo chmod +x scripts/use-978.sh
sudo chmod +x scripts/use-1090.sh
sudo chmod 600 homebase-app/api/mapbox_api.txt
8️⃣ Run Installer (One Time Only)
⚠️ If you’re running a Raspberry Pi 3b run this command sudo ./scripts/install.sh --skip-978.
cd /opt/homebase
sudo ./scripts/install.sh
- This installs:
- dump1090-fa
- dump978-fa
- nginx
- avahi-daemon
- systemd services
- Homebase dashboard
⚠️ Please allow several minutes for the install to complete. Unplugging power, turning off device, or exiting out of the terminal may corrupt the operating system. If that occurs you will have to re-flash the SD and start again. In some instances running the installer again finishes the unfinished jobs. When running the installer, it may ask you for Configuration file '/etc/chromium/master_preferences'. Proceed to type N and press ENTER when the terminal prompts you with *** master_preferences (Y/I/N/O/D/Z) [default=N] ?.
If you’re running a Raspberry Pi 3b with 1-2GB of memory you might encounter an issue with memory swapping. Dump978-fa will need to be excluded from the install as it’s intensive to the whole install process. You can run the install without dump978-fa with this script
sudo ./scripts/install.sh --skip-978Sometimes cURL doesn’t install and you get 500 errors. Run the following commands after instal:
sudo apt-get update
sudo apt-get install -y php8.4-curl
sudo systemctl restart php8.4-fpm
sudo systemctl reload nginx
Confirm cURL is installed and running php -m | grep -i curl.
✅ Verify Installation
Begin by plugging in your RTL-SDR receiver, bandpass filter (optional), and your 1090 equipped antenna.
Check ADS-B Services
systemctl status dump1090-fa --no-pager
systemctl status dump978-fa --no-pager
Expected default:
– ✅ dump1090-fa → active
– ❌ dump978-fa → inactive
Check Core Services
systemctl status nginx --no-pager
systemctl status avahi-daemon --no-pager
All should be active (running).
🌐 Access Homebase Dashboard
Preferred:
http://homebase.local
Fallback:
http://<raspberry-pi-ip>
If .local does not resolve:
sudo systemctl restart avahi-daemon
📡 ADS-B Band Operation
🟢 Default (Recommended): 1090 MHz
sudo ./scripts/use-1090.sh
or manually:
sudo systemctl stop dump978-fa
sudo systemctl start dump1090-fa
🔵 Switch to 978 MHz (US-only)
sudo ./scripts/use-978.sh
or manually:
sudo systemctl stop dump1090-fa
sudo systemctl start dump978-fa
⚠️ Important
Never run both simultaneously:
DO NOT DO THIS
sudo systemctl start dump1090-fa
sudo systemctl start dump978-fa
One RTL-SDR = One frequency band.
🩺 Health Check (First Troubleshooting Step)
sudo /opt/homebase/scripts/healthcheck.sh
This checks:
– RTL-SDR detection
– Active services
– Network connectivity
– Disk usage
– Web server status
🔄 Updating Homebase (Future Maintenance)
This is the only command needed for updates:
cd /opt/homebase
sudo ./scripts/update.sh
This safely:
– Pulls latest repo changes
– Updates systemd units if needed
– Reloads services
🔍 Manual Service Checks (Advanced)
systemctl status dump1090-fa
systemctl status dump978-fa
systemctl status nginx
systemctl status avahi-daemon
Restart a service if needed:
sudo systemctl restart dump1090-fa
🔁 Reboot & Confirm Persistence
sudo reboot
Reconnect:
ssh aeroframe-setup@homebase.local
Verify services:
systemctl status dump1090-fa
systemctl status nginx
Dashboard should still be accessible.
[SET alert_email.txt]
[SET device_id.txt]
SET mapbox_api.txt
When sudo ./scripts/update.sh you will need to re-enter your Mapbox API key in the txt file.
cd /opt/homebase
sudo nano homebase-app/api/mapbox_api.txt

sudo ls -lah /opt/homebase/homebase-app/api/mapbox_api.txt
sudo ls -lah /var/www/homebase/api/mapbox_api.txt
sudo cat /var/www/homebase/api/mapbox_api.txt

sudo nano /var/www/homebase/api/mapbox_api.txt
Remove boilerplate text and copy/paste Mapbox API key in text editor opened by nano. Type ctrl-X and Y to save.
[INSTALL TAILSCALE]